
Configure Outlook 2016 for Windows
In this help article you will find step-by-step instructions how to set up your Open-Xchange (POP/IMAP) mailbox in Microsoft Outlook 2016 for Windows.
This article contains the following sections:
- IMAP configuration instructions
- POP configuration instructions
I. IMAP configuration instructions:
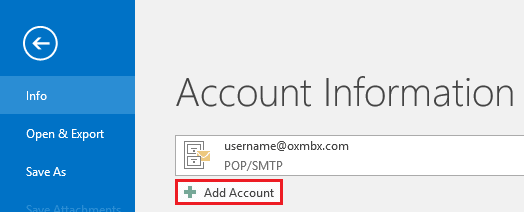
1. In Outlook, choose the File tab.

2. Under Account Information, choose Add Account.
3. On the Auto Account Setup page, choose Manual setup or additional server types, and then click Next.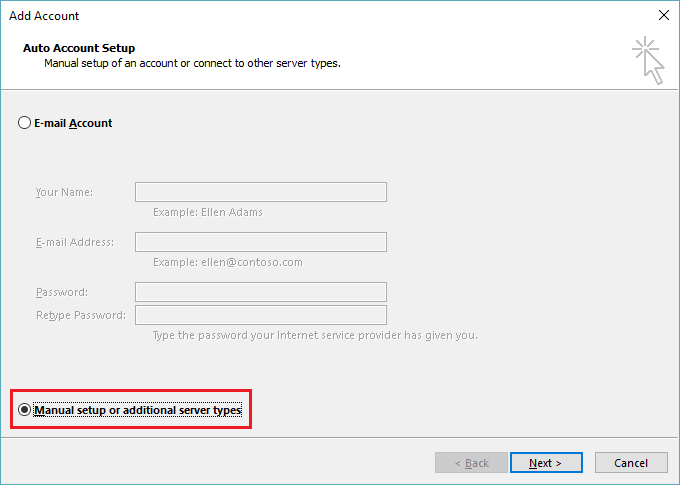
4. On the Choose Service page, choose POP or IMAP and click Next.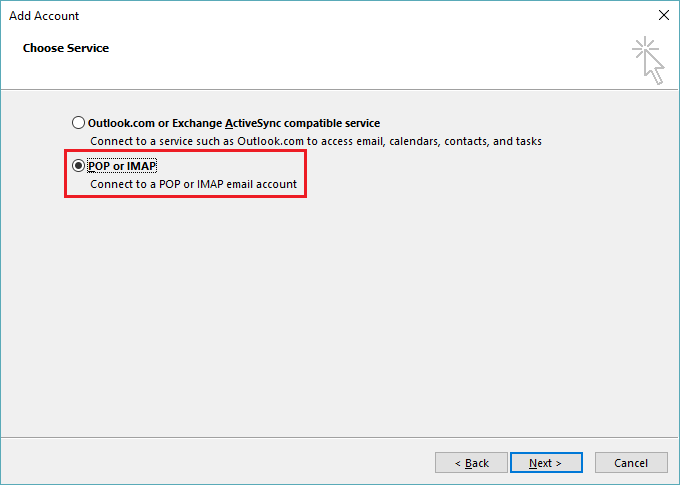
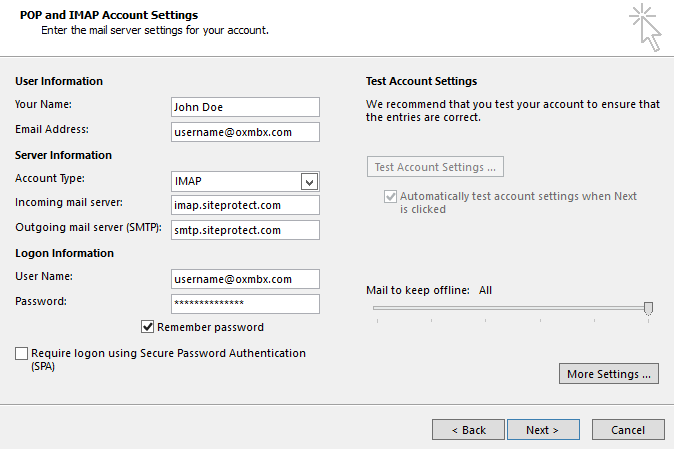
5. Next, on the POP and IMAP Account Settings page, enter the following information:
- Your name: Enter a display name (usually this is your first and last name)
- Email Address: Your full email address
- Account type: IMAP
- Incoming mail server: imap.siteprotect.com
- Outgoing mail server (SMTP): smtp.siteprotect.com
- User Name: Your full email address
- Password: Your e-mail account password
- Select the Remember password check box
- Do NOT select the Require logon using Secure Password Authentication (SPA) check box
6. Click More Settings to open the Internet E-mail Settings dialog box
7. Go to the Outgoing Server tab. Check My outgoing server (SMTP) requires authentication, and then select Use same settings as my incoming mail server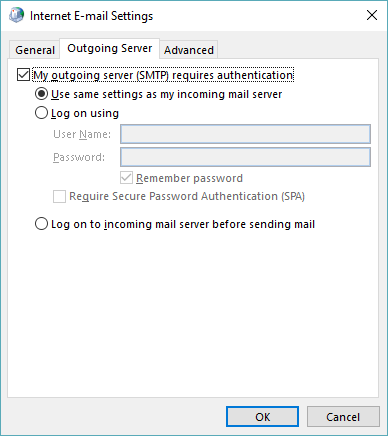
8. Go to the Advanced tab and use the settings shown in the screenshot.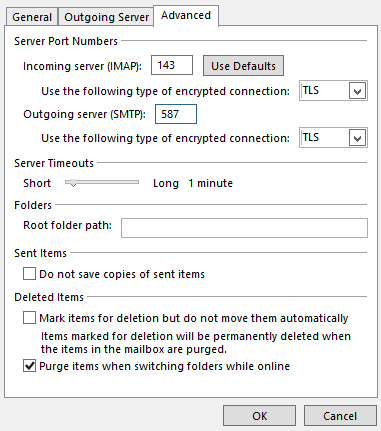
Server Port Numbers:
- Incoming server (IMAP): 143, Encryption: TLS
- Outgoing server (SMTP): 587, Encryption: TLS
Important Note: If a local firewall or your Internet Service Provider (ISP) blocks ports 143 or 587, you can use alternative ports as follows:
- Incoming server (IMAP): 993, Encryption: SSL
- Outgoing server (SMTP): 465, Encryption: SSL
9. Click OK to save the settings and to return to the POP and IMAP Account Settings page.
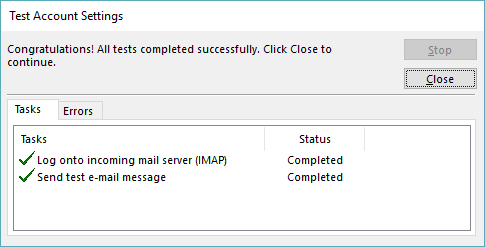
10. Click Next, and then verify that all tests complete successfully. Click Close to continue.
11. On the You’re all set! page, click Finish.
II. POP configuration instructions:
1. In Outlook, choose the File tab.

2. Under Account Information, choose Add Account.
3. On the Auto Account Setup page, choose Manual setup or additional server types, and then click Next.
4. On the Choose Service page, choose POP or IMAP and click Next.
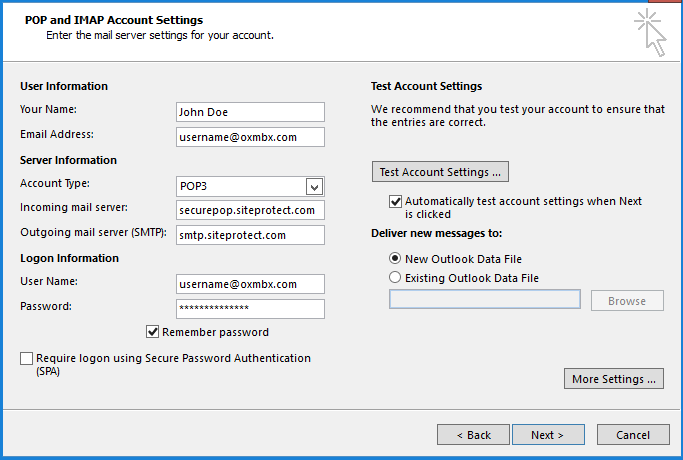
5. Next, on the POP and IMAP Account Settings page, enter the following information:
- Your name: Enter a display name (usually this is your first and last name)
- Email Address: Your full email address
- Account type: POP3
- Incoming mail server: securepop.siteprotect.com
- Outgoing mail server (SMTP): smtp.siteprotect.com
- User Name: Your full email address
- Password: Your e-mail account password
- Select the Remember password check box
- Do NOT select the Require logon using Secure Password Authentication (SPA) check box
6. Click More Settings to open the Internet E-mail Settings dialog box.
7. Go to the Outgoing Server tab. Check My outgoing server (SMTP) requires authentication, and then select Use same settings as my incoming mail server
8. Go to the Advanced tab and use the settings shown in the screenshot.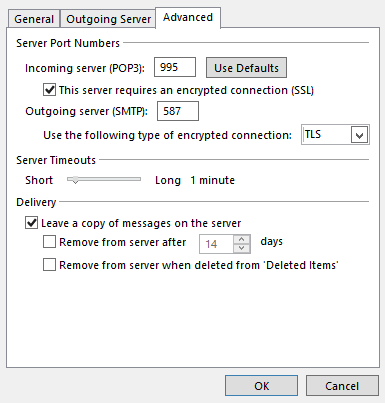
8.1 Server Port Numbers settings:
- Incoming server (POP3): 995, Encryption: SSL
- Outgoing server (SMTP): 587, Encryption: TLS
Important Note: If a local firewall or your Internet Service Provider (ISP) blocks port 587, you can use alternative port as follows:
- Outgoing server (SMTP): 465, Encryption: SSL
8.2 Delivery settings:
- Select the Leave a copy of messages on the server check box.
- You can select the Remove from server after 14 days based on your preference.
9. Click OK to save the settings and to return to the POP and IMAP Account Settings page.
10. Click Next, and then verify that all tests complete successfully. Click Close to continue.

11. On the You’re all set! page, click Finish.