
Force a website to https using IIS Custom Error pages
A well common requirement for secure websites is not only to support https but to make it mandatory. The problem is that if you require an SSL from your website, the end user receives an ugly 403.4 message that informs that SSL is required. Why doesn’t IIS have a simple check box in the “Require SSL” dialog to “auto redirect requests to https” is unclear to me, but in this post I’ll explain how simple it is to accomplish this without writing any code at all.
So, in order to force a website to https and redirect normal http requests to https you have various methods. At times I did this using server code: detect if you’re running a normal http and redirect from the server. But recently I attempted this using simple IIS configuration. The idea is as follows:
- Tweak IIS to require SSL. By default, this will inform the user of a 403.4 auth error.
- Using IIS’ Custom Errors feature, customize the 403.4 to redirect to https.
Before we start: naturally, you need a valid SSL certificate for this procedure to work. If you just need a test certificate for development and practice, you can IIS to generate a dummy certificate for you like so:
- In IIS Manager, select the Server name on the left.
- Go into Server Certificates in the Features View.
- In the Actions pane on the right, select Create Self-Signed Certificate.
To enable SSL on your website after you have installed an SSL certificate:
- In IIS Manager, select the target website.
- On the Actions pane on the right, click Bindings.
- In the opening dialog, click Add, select “https” and then select the desired certificate.
- Test that SSL is working by browsing to https.
Now we can configure a redirect to https.
Tweaking IIS to require SSL
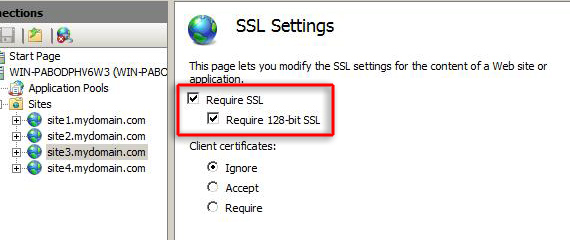
Open IIS and select the target website or virtual application. In the Features View, select SSL Settings.

Select “Require SSL” and “Accept”. Do not select “Require” or this won’t work at all.

Now if you try to browse to http as usual, you should see a 403.4 message like so:

Using Custom Error pages
In order to use custom Error pages, this feature must be installed. If you notice that your IIS does not provide the Error Pages feature, simply install it (the screenshot below is from Windows 7):

In IIS, select on the left the target server, website or application. On the Features View select Error Pages under IIS (note: this is NOT the same as .NET Error Pages under ASP.NET):

In the right pane select “Edit Features Settings…”

In the dialog that opens, select “Custom error pages” and click OK. This means that when you when we configure a redirect later on, it will actually be in effect:

Finally, we have to define a new “error page” rule, to handle 403.4 and perform a redirect. Just click on the Add in the Actions pane to the right and fill-in the desired redirect rule details:

Eventually, this would look like this:

That’s it. Now if you browse to http you should be redirected to https. The web.config looks as follows:
| 1 2 3 4 5 6 7 8 9 | <?xml version="1.0" encoding="UTF-8"?><configuration><system.webServer><httpErrors><remove statusCode="403" subStatusCode="4" /><error statusCode="403" subStatusCode="4" path="https://localhost"responseMode="Redirect" /></httpErrors></system.webServer></configuration> |
Method 2: Using Microsoft URL Rewrite Module
For this method of redirecting from HTTP to HTTPS, you will need to do the following;
- Install the Microsoft URL Rewrite Module
- Install your SSL certificate in IIS 7 and bind it to your website
- Make sure Require SSL is NOT checked under SSL Settings for your website (uncheck the boxes that are checked in this screenshot)
- Copy and paste the following code between the <rules> and </rules> tags in your web.config file in your website root directory.
<rule name="HTTP to HTTPS redirect" stopProcessing="true">
  <match url="(.*)" />
    <conditions>
      <add input="{HTTPS}" pattern="off" ignoreCase="true" />
    </conditions>
  <action type="Redirect" redirectType="Found" url="https://{HTTP_HOST}/{R:1}" />
</rule> - Test the site by going to http://www.yoursite.com and making sure it redirects
Method 3: Adding the rewrite scripts in web.config file
<configuration>
<system.webServer>
<rewrite>
    <rules>
       <rule name="HTTP to HTTPS redirect" stopProcessing="true">
         <match url="(.*)" />
         <conditions>
           <add input="{HTTPS}" pattern="off" ignoreCase="true" />
         </conditions>
         <action type="Redirect" redirectType="Permanent" url="https://{HTTP_HOST}/{R:1}" />
       </rule>
    </rules>
</rewrite>
</system.webServer>
</configuration>